My Journey with DDNS: Simplifying Home Name Resolution with Docker
My Intro to Dynamic DNS
A few years ago, I found myself annoyed with my ISP (as we all are at some point for various reasons). I had been setting up a Wireguard VPN for the first time so I could access the internet from my home network, rather than relying on vendor VPNs. Fairly easy overall. The problem? My ISP assigned me a dynamic IP address with a relatively short lease time. Every time the power would go out or my router would perform an update and do a longer reboot, I’d lose my IP address. This meant that every time this would happen, I would have to go into the DNS console of my domain registrar and update my public IP address so I could keep using my domain name to connect.
After being frustrated with how often I was doing this, I learned about Dynamic DNS. With DDNS, I could automate the changing IP address to my domain. This way, I could access my home services without needing to remember a new IP every time there was a change. Super convenient! My old router, the trusty UniFi USG-3, had a DDNS updater already built into its software, but I know not every router has this function. So instead of relying on the router, let’s set DDNS updates with a Docker container so that we can host this small service anywhere we go on just about any hardware we have.
Setting up Cloudflare DDNS with Docker - Step-by-Step
Follow along with me so you can set up your own DDNS container!
Don’t have time to follow along? Know most of the steps already? Clone the GitHub repo here to deploy your DDNS container now!
Prerequisites:
- A working Docker installation on your system.
- A Cloudflare-managed domain (does not have to be registered with Cloudflare).
- 15 minutes of your time.
Phase 1: DNS Setup
First, we need to set up an A Record on Cloudflare for the Docker container to manage.
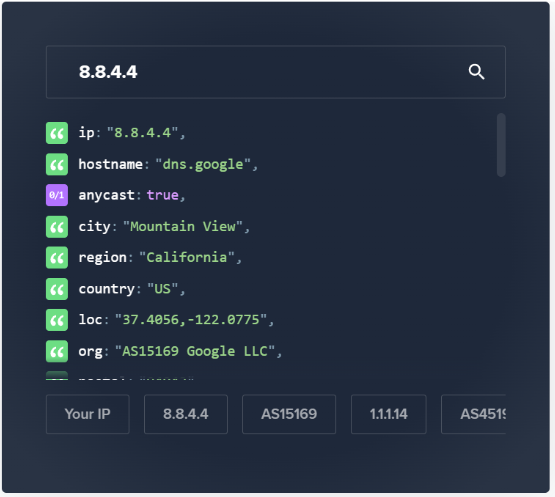
- Get Your Public IP Address: There are many ways to do this, but one of the easiest is to navigate to ipinfo.io in your web browser. It will display your connection information right on the homepage. This image uses Google’s DNS server as an example.
- Set Up an A Record in Cloudflare: Grab that IP address and head over to Cloudflare. From your homepage, click on the domain you want to manage, then click DNS in the left-hand menu. Create two DNS records:
- One for
www - One for
YOUR_DOMAIN.com(make sure to replaceYOUR_DOMAINwith your actual domain).
- One for
Phase 2: Generate Your API Token & Save Your Zone Identifier
Next, we need to generate a token for the Docker container to communicate with Cloudflare.
- Click on the profile icon in the top right corner and select My Profile.
- In the left-hand menu, click API Tokens.
- Click the Create Token button, use the Edit zone DNS template, and under Zone Resources, select all domains or choose your specific domain from the dropdown. Click View Summary, then Create Token.
- Copy this token somewhere immediately; once you close the dialog box, you won’t be able to see it again. If you lose it, you can always create a new one.
- To find your Zone Identifier, go back to your domain’s overview page. The Zone Identifier is typically found toward the bottom right of the page, under the API section.
Phase 3: Docker Setup
Now, let’s put all the pieces together to automate the process. We’ll use the ddns-updater container image from qdm12 on GitHub, which supports many DNS providers, but today we’re sticking with Cloudflare.
- Create Project Structure: Open your terminal and change to the directory where you want to store your files. Run:
1
mkdir -p ./ddns-updater/data && touch compose.yaml ./ddns-updater/data/config.json
This creates a folder for the project, a data folder for the container, a Docker Compose file, and a config.json file for the container’s configuration.
- Edit
compose.yaml: Opencompose.yamlin your favorite editor and paste in the following:
1
2
3
4
5
6
7
8
9
10
services:
  ddns-updater:
    container_name: ddns-updater
    hostname: ddns-updater
    image: qmcgaw/ddns-updater
    restart: unless-stopped
    ports:
      - 8000:8000/tcp          # Maps port 8000 on the host to port 8000 within the container
    volumes:
      - ./data:/updater/data   # Maps the data folder to the /updater/data folder within the container
This sets up the Docker service with a few key configurations. The restart: unless-stopped option ensures your container restarts automatically if it crashes or if your machine reboots.
- Edit
config.json: Open./ddns-updater/data/config.jsonand paste in the following:1 2 3 4 5 6 7 8 9 10 11 12 13 14
{ "settings": [ { "provider": "cloudflare", "zone_identifier": "INSERT_ZONE_IDENTIFIER", "domain": "YOUR_DOMAIN.com", "ttl": 600, "token": "INSERT_API_TOKEN", "proxied": true, "ip_version": "ipv4", "ipv6_suffix": "" } ] }
Replace
INSERT_ZONE_IDENTIFIERwith your actual Zone Identifier andINSERT_API_TOKENwith the token you generated earlier.
The “proxied”: true option allows Cloudflare to handle traffic for your domain, which can provide additional benefits like DDoS protection and caching. I use it for my setup, but it’s not mandatory.
Phase 4: Docker Setup
If everything is set up correctly, we can start our container and access the user interface. Change directories into the ddns-updater directory and run:
1
docker compose up --build -d
Now, pop over to a web browser and type in http://localhost:8000. You should see the status page with the Dynamic DNS updates listed!
Hopefully, you were able to make it to the last step! Thanks for following along, and hope you learned a bit today to make your life easier. Maybe we’ll build on this and set up that VPN, or even set up a Caddy Reverse Proxy next time.


